
Sunday 4 March 2012
Sunday 12 July 2009
After the Project

I was given an IR film which was 20 years old by my Tutor and I took it to New York in April. When we processed it, we didn't know the necessary developing settings [strength of dev or timings] so we made it up as we went along.
So, the film didn't quite develop properly. However, I quite like the images I got.
Wednesday 18 March 2009
Reflection - The Journey
I found this project quite a short lived one, which took a while to get started. Initially, the idea had been in my mind for a while, and it took a bit of working out what sort of images I wanted to take.
I found getting hold of the right film a bit of a struggle, as there were so many different types and so many stories of problems with exposure calculation, processing issues, filters to use [and I hadn't at that point even thought about a filter]. Luckily, there is a shop I found in Mansfield that sold the film I wanted, and had plenty in stock.
Then, once I had the film, I traipsed round Nottingham looking for an IR filter, most shops - even the 'specialist' one - hadn't even heard of IR films, let alone the filters. So, I had to resort to ebay. Unfortunately, the problem with this is that you don't fully know what you are buying, so I ended up with a filter that wouldn't let nearly enough light in. So, I took a half-film of images but none came out. I will take the filter on holiday though, and see if I get any when the days are brighter, on very long exposures.
I tried out a filter that George has lent me, and took some photos in college, and processed them and they came out well. A lack of IR light maybe, but some effects all the same.
I had to leave the photography for a while, as we had stuff going on at home, and at work, and on the days that the light was really good, I found myself stuck at Client's offices and when I was able to take photos, it was dull grey days. I got an opening one afternoon, just before I was leaving for college, the sun came out and I took some photos outside and down in the garden. As I left for college - I had about 6 shots left on the film, so I took 3 of the sky across the fields, 2 out of the car window and one as I saw in traffic lights. These 3 over the fields came out really well and I used them for the final images.
I printed them up using the Fibre paper and Agfa Neutol developer at college. I managed to get a good exposure for the images, and in one evening I managed to get all 3 images printed, even allowing for test strips and spoilt prints [included in the sketchbook].
I brought them home and - as they need over 30 minutes of washing to enable proper archiving and to avoid colouring of the paper - I put them in a the bath at home and gave them a good hour's wash. They dried out overnight and during the next day and once dry, I put them under some heavy books to flatten them out a bit.
I then mounted them onto foam board. I decided to make them more letterbox than 10x8 [which is the size they were printed at] as this lengthened the effect of the horizon.
I have enjoyed this, and still have plenty of IR film left to use over the next few months. I am planning on doing much more IR photography, and am currently looking into getting the HOYAR72 filter, as it can be used on some digital cameras to replicate the IR effects without any other manipulation.
Tuesday 10 March 2009
Image 22

This was taken from the car window as I waited at the traffic lights on the way to college. I do like the contrasts and the blackness of the trees.


Image 19

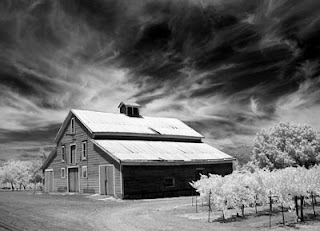
The first of the pictures that I have decided will be my final 3. The sun was setting and the sky was really red and I thought I'd try and get some shots and see how they came out. I took 3 in quick succession, and tried to expose for the sky and not the trees. I also used a small aperture to try and capture the detail in the clouds. The three shots are in a panoramic style, across the horizon, overlooking a field right outside my house.

Image 17

Shot of grasses in the foreground, with buildings in the background but focussed close to the camera. I do like this, and would try to up the contrast if I could, to bring the grasses out of the pictures.
Image 16
 Another of grasses with buildings in the background, I quite like this one as I like the fencing on the left hand side. I think the framing is a little out, and the shot could have been composed better if I had turned the camera a little to the left.

Image 14

I think this is one of my favourites, with the dustbin and makeshift lid which is weighed down with a brick, and the detail that I have managed to catch in the whole image. I haven't printed this up yet, in the darkroom, but I am looking forward to doing so.

Image 12

I like the central focus of this image, the plant pot on top of the fencepost. I think this image needs more black and if I was printing it, I would try to darken the shot to get better contrasts.
Image 11

This is of grasses in the garden, with the focus on the buildings in the distance. It's a bit too hazy to be used.
Image 10

Much like the previous shot, it would have been nicer if the background was darker but I really like this shot of the grasses.
Image 9

Image taken in the garden of spring onions in a raised bed. I would have liked the background to have been darker for the onions and wood to stand out more - perhaps some dodging and burning in the dark room/photoshop would be able to bring it alive.

Image 7

I took this and the rest of the shots on this film, at 5:15 as I had been waiting for sun for days and suddenly it was there. The sky was showing a remarkable sunset and was very bright. I quite like the atmospherical unsharpness which was due to unaccurate focussing. I should have focussed and then put the filter on but I kept the filter on throughout all these, focussed as well as I could, set the exposure and took the shot. I didn't know how much sun I would get so I had to take these all really quickly.

Image 5

I really like this one, it is also taken in the art block with little IR light available. I might have to revisit this one by taking the idea somewhere where more IR light is around.
Image 4

This is a close up of foliage, taken also in the art block. I haven't lightened this, by changing the levels once scanned, as I thought it looked better darker [inspired by John Blakemore's images seen last week].
Image 3

Same as Image 2, but with more emphasis on the foliage. The scanner has picked up a water mark on the film, I've left that in the image as it is only a test image and not important.
Image 2

In this shot, also just trying out the film and filter, I took some shots of plaster of paris 'heads' in the art block, expecting them to come out dark and the foliage to come out light and the opposite happened. I am assuming that the foliage has no IR light to reflect, but the plaster of paris seems to reflect whatever light is available rather well.
Monday 9 March 2009
Image 1

This is the first of my successful shots; in that it came out with actual pictures on it. It is taken of the inside of the art block. My previous film with the other filter was totally blank so it was good to get any images at all.
It is interesting the reflected light that has been captured from the wood that is sitting horizontally from the side of the room to the separating board. I also think the white of the board is nice and clean, even though there can be limited IR light indoors.
Wednesday 11 February 2009
First round of shots
I've set up a shoot, and trying to determine the exposure isn't the easiest of things. Mainly, because the filter doesn't let any light in to see the exposure settings.
So, I have used the filter on my Digital camera to determine the difference between no filter exposure and filter exposure - and there are 17 stops between them.
So, for a F1.7 [my largest aperture] without filter, I get 1/15 as a shutter speed. 17 stops below this is an hour's exposure. I'm not sure whether this is right or not - so I'm going to take 5 shots to determine the difference between no filter and filter on this camera.
I've taken 5 shots.
F1.7 @ 10s exposure, 1 minute, 4 minutes, 11 minutes and 20 minutes.
I'll go into the darkroom tomorrow night, cut the film and process this little section. I might take some outdoors tomorrow at a range of shutter speeds and see what happens.
After processing, it seems that this set of shots is totally useless, as the film came out blank. We discussed it in class and it appears that the filter is far too dense and not enough IR light was being let through. Back to the drawing board.
Thursday 5 February 2009
Pictures in IR
 These first 3 images are on the IR Board link, on here. They are part of a monthly competition and I think they are fabulous. They were taken I believe, on Digital cameras with an IR filter that filters out non-IR light.
I think this shot is wonderful, the IR light makes the tree look so surreal and eerie, I think picking the right sort of tree, must have helped.
 This one was taken at 1pm, and it shows that images can be taken in strong sunlight, with the right filter.
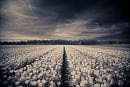 This image was found on Google search, and is credited to a flickr account. It is of tulips and i think it is excellent, both in composition, and depth of field use.
 This image is the first I can find in IR, credited to Robert Williams Wood, who is said to be the 'inventor' of IR photography. it shows the black sky and white foliages that IR photography is known for.
 This one was taken at 1pm, and it shows that images can be taken in strong sunlight, with the right filter.
  This image was found on Google search, and is credited to a flickr account. It is of tulips and i think it is excellent, both in composition, and depth of field use.
  This image is the first I can find in IR, credited to Robert Williams Wood, who is said to be the 'inventor' of IR photography. it shows the black sky and white foliages that IR photography is known for.
 Loaded

Ann Goddard 'Enclaves 2' 2003
Well, at long last, the film is in the camera.
I'm just going to reread the film instructions and then I can start shooting. I need to do this to try and get a decent exposure.
I'm going to start with some warm objects on a cold background, inspired by a piece of artwork by Ann Goddard [Enclaves 2, above] that we bought last year. I'm going to line up bits of chopped vegetables and shoot from above. I'm going to shoot 3 lots of 3 - at 3 different exposures and then cut the film and process the first 9 shots as this film is quite expensive and I don't want to waste it.
I put the film into the camera under the quilt at home, in the dark and have taped up the camera itself to avoid IR light leaks. I'm keeping it in a black bag for the time being for this same reason.
Friday 23 January 2009
Filter
The filter has arrived.
So, the plan is to use up the rest of my B&W Film in the camera this weekend and to start shooting some IR next week.
Monday 19 January 2009
Filter
I've had to buy a Filter from ebay as nobody has the right ones in stock and by the time I've ordered them and picked them up, the ebay one will be delivered.
It is a R72 IR filter.
Saturday 17 January 2009
Filter
I have found the right filter, I just haven't got an adapter. I'll need to do some looking online for an adapter or a filter at a decent price as none of the shops had them in stock today.
Monday 12 January 2009
Materials Analysis
Here I will research and analyse the effects that different materials have when recorded on IR film; trees/sky/grass/water/glass etc
The reason that IR images look 'false' is that the film captures the non-visible part of light, and the filter block blue wavelengths. The upshot is that some materials which reflect visible light do not reflect non-visible light [water, glass] and some that usually absorb visible light will reflect non-visible [grass, trees].
Historical Context - paper
Fibre papers have been used historically within photography for high quality fine art, exhibition or archiving purposes. It 'takes' the picture in a different way to popular photography paper as it colours to a depth, it doesn't just sit on top of the paper. For Black and White photography, it gives darker blacks and gives images a quality that isn't present in resin-coated papers. It also brings to life certain detail that just isn't captured in RC papers.
It also makes re-touching of images easier, and toning and handcolouring are also popular due to the 'arty' finish of the paper and the ease of manipulating the paper.
I want to use Fibre based paper for this project, as I want the blacks and whites captured by the IR film to be enhanced by the paper it is printed on.
The paper I'm using is Kentmere Document Art Grade 2.
Historical Context - IR film
Historically, IR film came into being around 1910, and was initially used by Robert Wood. It became a viable option once it was discovered that Silver Halide emulsions could be mixed with a dye to become sensitive to IR light.
Both colour and B&W are available. The colour has been used extensively during the 60s by artists such as Jimi Hendrix, to reflect the psychedelic aesthetic of the time. B&W has been used extensively throughout and is well known as a fine art technique with high contrasts. Colour has also been used to detect the presence of people by recording heat generated by a living body.
Filter
I'm going to need a Red filter for this film. Recommended filters are listed on the inside cover of the SFX 200 film box. I think I might have one of these already, as I inherited a box of filters a while back, so I'm going to search these out before I buy anything.
Buying the Film 2

I've bought the film. I have 3 rolls of 35mm and 1 roll of 120 - once I've customised the Holga to not absorb IR light - by covering in foil - I'll try some Holga shots as I am going through this project.
Friday 9 January 2009
Buying the film 1
I've called Morco in Mansfield, and they have 3 rolls of the Ilford IR film in. they're open M-F, 9-5; so I'll pop over there next week and get it.
I'll look into the chemicals before hand in case I need to buy any additional materials.
A2 Fibre Optics
I am currently in year 2 of A Level Photography at Castle Col
This is the first post in my A2 Photography Personal Study.

lege, Nottingham.
The personal study that I have chosen is to take photographs using Infrared film, to develop the film and to print the images onto fibre based paper. I've chosen this because infrared measures reflected infrared energy, and records the image completely differently to 'regular' film. I have chosen fibre paper because it prints in more than one dimension, it has depths that 'regular' paper doesn't have.
I am first going to research the history of using infrared film, and the various methods of developing the film. I have already looked into the purchase of the film, and it seems that 35mm would be the easiest to use, although 120 film is available, it might not suit my Holga camera for this project [ the camera might need some work on it before it was keep out all the infrared light].
I am going to research online, and look at any specialists that work within the infrared spectrum.
I am going to look at [photographers]
I will be using the following equipment for this project.
A film camera, Ricoh XR-1 35mm, using a 50mm lens, Ilford SFX 200 film and an SFX 200 Cokin P series filter
I will decide on the developer chemicals once I have researched the film
I will use the college darkroom and develop the film there
I will use the college enlarger and developing suite, using [developer]
I will use Kentmere Fibre Paper to print
I will look to produce 6 finished prints, which will be framed and submitted.
All research, pre-work, contact sheets and printing will be scanned into this blog
Original course requirements:

Subscribe to:
Posts (Atom)
